Docker基础技术:Linux Namespace(下)
 在 Docker基础技术:Linux Namespace(上篇)中我们了解了,UTD、IPC、PID、Mount 四个namespace,我们模仿Docker做了一个相当相当山寨的镜像。在这一篇中,主要想向大家介绍Linux的User和Network的Namespace。
好,下面我们就介绍一下还剩下的这两个Namespace。
目录
User Namespace
User Namespace主要是用了CLONE_NEWUSER的参数。使用了这个参数后,内部看到的UID和GID已经与外部不同了,默认显示为65534。那是因为容器找不到其真正的UID所以,设置上了最大的UID(其设置定义在/proc/sys/kernel/overflowuid)。
要把容器中的uid和真实系统的uid给映射在一起,需要修改 /proc/<pid>/uid_map 和 /proc/<pid>/gid_map 这两个文件。这两个文件的格式为:
其中:
- 第一个字段ID-inside-ns表示在容器显示的UID或GID,
- 第二个字段ID-outside-ns表示容器外映射的真实的UID或GID。
- 第三个字段表示映射的范围,一般填1,表示一一对应。
比如,把真实的uid=1000映射成容器内的uid=0
$ cat /proc/2465/uid_map
         0       1000          1
再比如下面的示例:表示把namespace内部从0开始的uid映射到外部从0开始的uid,其最大范围是无符号32位整形
$ cat /proc/$$/uid_map
         0          0          4294967295
另外,需要注意的是:
- 写这两个文件的进程需要这个namespace中的CAP_SETUID (CAP_SETGID)权限(可参看Capabilities)
- 写入的进程必须是此user namespace的父或子的user namespace进程。
- 另外需要满如下条件之一:1)父进程将effective uid/gid映射到子进程的user namespace中,2)父进程如果有CAP_SETUID/CAP_SETGID权限,那么它将可以映射到父进程中的任一uid/gid。
这些规则看着都烦,我们来看程序吧(下面的程序有点长,但是非常简单,如果你读过《Unix网络编程》上卷,你应该可以看懂):
#define _GNU_SOURCE
#include <stdio.h>
#include <stdlib.h>
#include <sys/types.h>
#include <sys/wait.h>
#include <sys/mount.h>
#include <sys/capability.h>
#include <stdio.h>
#include <sched.h>
#include <signal.h>
#include <unistd.h>

#define STACK_SIZE (1024 * 1024)

static char container_stack[STACK_SIZE];
char* const container_args[] = {
    "/bin/bash",
    NULL
};

int pipefd[2];

void set_map(char* file, int inside_id, int outside_id, int len) {
    FILE* mapfd = fopen(file, "w");
    if (NULL == mapfd) {
        perror("open file error");
        return;
    }
    fprintf(mapfd, "%d %d %d", inside_id, outside_id, len);
    fclose(mapfd);
}

void set_uid_map(pid_t pid, int inside_id, int outside_id, int len) {
    char file[256];
    sprintf(file, "/proc/%d/uid_map", pid);
    set_map(file, inside_id, outside_id, len);
}

void set_gid_map(pid_t pid, int inside_id, int outside_id, int len) {
    char file[256];
    sprintf(file, "/proc/%d/gid_map", pid);
    set_map(file, inside_id, outside_id, len);
}

int container_main(void* arg)
{

    printf("Container [%5d] - inside the container!\n", getpid());

    printf("Container: eUID = %ld;  eGID = %ld, UID=%ld, GID=%ld\n",
            (long) geteuid(), (long) getegid(), (long) getuid(), (long) getgid());

    /* 等待父进程通知后再往下执行(进程间的同步) */
    char ch;
    close(pipefd[1]);
    read(pipefd[0], &ch, 1);

    printf("Container [%5d] - setup hostname!\n", getpid());
    //set hostname
    sethostname("container",10);

    //remount "/proc" to make sure the "top" and "ps" show container's information
    mount("proc", "/proc", "proc", 0, NULL);

    execv(container_args[0], container_args);
    printf("Something's wrong!\n");
    return 1;
}

int main()
{
    const int gid=getgid(), uid=getuid();

    printf("Parent: eUID = %ld;  eGID = %ld, UID=%ld, GID=%ld\n",
            (long) geteuid(), (long) getegid(), (long) getuid(), (long) getgid());

    pipe(pipefd);

    printf("Parent [%5d] - start a container!\n", getpid());

    int container_pid = clone(container_main, container_stack+STACK_SIZE,
            CLONE_NEWUTS | CLONE_NEWPID | CLONE_NEWNS | CLONE_NEWUSER | SIGCHLD, NULL);


    printf("Parent [%5d] - Container [%5d]!\n", getpid(), container_pid);

    //To map the uid/gid,
    //   we need edit the /proc/PID/uid_map (or /proc/PID/gid_map) in parent
    //The file format is
    //   ID-inside-ns   ID-outside-ns   length
    //if no mapping,
    //   the uid will be taken from /proc/sys/kernel/overflowuid
    //   the gid will be taken from /proc/sys/kernel/overflowgid
    set_uid_map(container_pid, 0, uid, 1);
    set_gid_map(container_pid, 0, gid, 1);

    printf("Parent [%5d] - user/group mapping done!\n", getpid());

    /* 通知子进程 */
    close(pipefd[1]);

    waitpid(container_pid, NULL, 0);
    printf("Parent - container stopped!\n");
    return 0;
}
上面的程序,我们用了一个pipe来对父子进程进行同步,为什么要这样做?因为子进程中有一个execv的系统调用,这个系统调用会把当前子进程的进程空间给全部覆盖掉,我们希望在execv之前就做好user namespace的uid/gid的映射,这样,execv运行的/bin/bash就会因为我们设置了uid为0的inside-uid而变成#号的提示符。
整个程序的运行效果如下:
hchen@ubuntu:~$ id
uid=1000(hchen) gid=1000(hchen) groups=1000(hchen)

hchen@ubuntu:~$ ./user #<--以hchen用户运行
Parent: eUID = 1000;  eGID = 1000, UID=1000, GID=1000
Parent [ 3262] - start a container!
Parent [ 3262] - Container [ 3263]!
Parent [ 3262] - user/group mapping done!
Container [    1] - inside the container!
Container: eUID = 0;  eGID = 0, UID=0, GID=0 #<---Container里的UID/GID都为0了
Container [    1] - setup hostname!

root@container:~# id #<----我们可以看到容器里的用户和命令行提示符是root用户了
uid=0(root) gid=0(root) groups=0(root),65534(nogroup)
虽然容器里是root,但其实这个容器的/bin/bash进程是以一个普通用户hchen来运行的。这样一来,我们容器的安全性会得到提高。
我们注意到,User Namespace是以普通用户运行,但是别的Namespace需要root权限,那么,如果我要同时使用多个Namespace,该怎么办呢?一般来说,我们先用一般用户创建User Namespace,然后把这个一般用户映射成root,在容器内用root来创建其它的Namesapce。
Network Namespace
Network的Namespace比较啰嗦。在Linux下,我们一般用ip命令创建Network Namespace(Docker的源码中,它没有用ip命令,而是自己实现了ip命令内的一些功能——是用了Raw Socket发些“奇怪”的数据,呵呵)。这里,我还是用ip命令讲解一下。
首先,我们先看个图,下面这个图基本上就是Docker在宿主机上的网络示意图(其中的物理网卡并不准确,因为docker可能会运行在一个VM中,所以,这里所谓的“物理网卡”其实也就是一个有可以路由的IP的网卡)
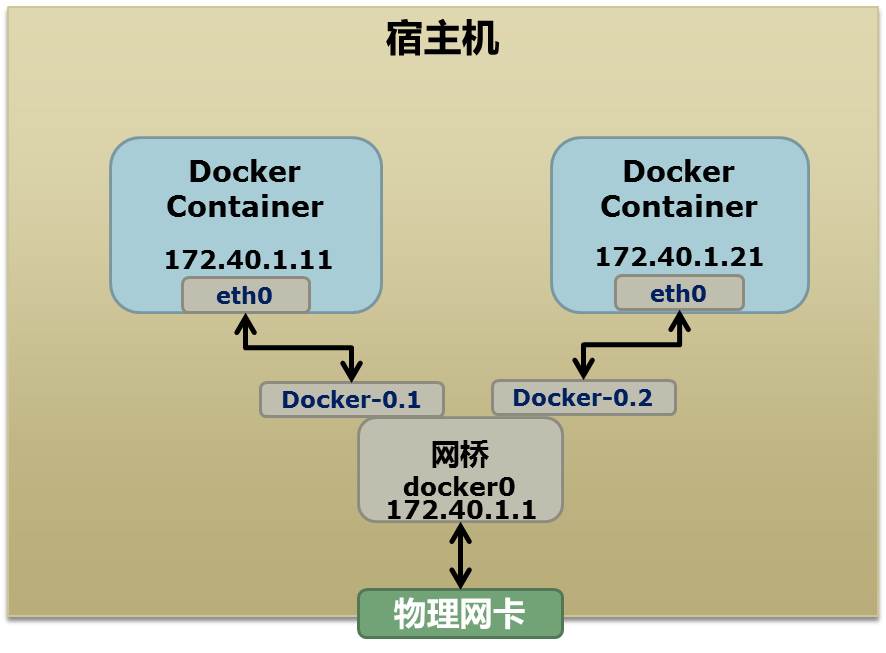
上图中,Docker使用了一个私有网段,172.40.1.0,docker还可能会使用10.0.0.0和192.168.0.0这两个私有网段,关键看你的路由表中是否配置了,如果没有配置,就会使用,如果你的路由表配置了所有私有网段,那么docker启动时就会出错了。
当你启动一个Docker容器后,你可以使用ip link show或ip addr show来查看当前宿主机的网络情况(我们可以看到有一个docker0,还有一个veth22a38e6的虚拟网卡——给容器用的):
hchen@ubuntu:~$ ip link show
1: lo: <LOOPBACK,UP,LOWER_UP> mtu 65536 qdisc noqueue state ...
    link/loopback 00:00:00:00:00:00 brd 00:00:00:00:00:00
2: eth0: <BROADCAST,MULTICAST,UP,LOWER_UP> mtu 1500 qdisc ...
    link/ether 00:0c:29:b7:67:7d brd ff:ff:ff:ff:ff:ff
3: docker0: <BROADCAST,MULTICAST,UP,LOWER_UP> mtu 1500 ...
    link/ether 56:84:7a:fe:97:99 brd ff:ff:ff:ff:ff:ff
5: veth22a38e6: <BROADCAST,UP,LOWER_UP> mtu 1500 qdisc ...
    link/ether 8e:30:2a:ac:8c:d1 brd ff:ff:ff:ff:ff:ff
那么,要做成这个样子应该怎么办呢?我们来看一组命令:
## 首先,我们先增加一个网桥lxcbr0,模仿docker0
brctl addbr lxcbr0
brctl stp lxcbr0 off
ifconfig lxcbr0 192.168.10.1/24 up #为网桥设置IP地址

## 接下来,我们要创建一个network namespace - ns1

# 增加一个namesapce 命令为 ns1 (使用ip netns add命令)
ip netns add ns1

# 激活namespace中的loopback,即127.0.0.1(使用ip netns exec ns1来操作ns1中的命令)
ip netns exec ns1   ip link set dev lo up

## 然后,我们需要增加一对虚拟网卡

# 增加一个pair虚拟网卡,注意其中的veth类型,其中一个网卡要按进容器中
ip link add veth-ns1 type veth peer name lxcbr0.1

# 把 veth-ns1 按到namespace ns1中,这样容器中就会有一个新的网卡了
ip link set veth-ns1 netns ns1

# 把容器里的 veth-ns1改名为 eth0 (容器外会冲突,容器内就不会了)
ip netns exec ns1  ip link set dev veth-ns1 name eth0

# 为容器中的网卡分配一个IP地址,并激活它
ip netns exec ns1 ifconfig eth0 192.168.10.11/24 up


# 上面我们把veth-ns1这个网卡按到了容器中,然后我们要把lxcbr0.1添加上网桥上
brctl addif lxcbr0 lxcbr0.1

# 为容器增加一个路由规则,让容器可以访问外面的网络
ip netns exec ns1     ip route add default via 192.168.10.1

# 在/etc/netns下创建network namespce名称为ns1的目录,
# 然后为这个namespace设置resolv.conf,这样,容器内就可以访问域名了
mkdir -p /etc/netns/ns1
echo "nameserver 8.8.8.8" > /etc/netns/ns1/resolv.conf
上面基本上就是docker网络的原理了,只不过,
- Docker的resolv.conf没有用这样的方式,而是用了上篇中的Mount Namesapce的那种方式
- 另外,docker是用进程的PID来做Network Namespace的名称的。
了解了这些后,你甚至可以为正在运行的docker容器增加一个新的网卡:
ip link add peerA type veth peer name peerB
brctl addif docker0 peerA
ip link set peerA up
ip link set peerB netns ${container-pid}
ip netns exec ${container-pid} ip link set dev peerB name eth1
ip netns exec ${container-pid} ip link set eth1 up ;
ip netns exec ${container-pid} ip addr add ${ROUTEABLE_IP} dev eth1 ;
上面的示例是我们为正在运行的docker容器,增加一个eth1的网卡,并给了一个静态的可被外部访问到的IP地址。
这个需要把外部的“物理网卡”配置成混杂模式,这样这个eth1网卡就会向外通过ARP协议发送自己的Mac地址,然后外部的交换机就会把到这个IP地址的包转到“物理网卡”上,因为是混杂模式,所以eth1就能收到相关的数据,一看,是自己的,那么就收到。这样,Docker容器的网络就和外部通了。
当然,无论是Docker的NAT方式,还是混杂模式都会有性能上的问题,NAT不用说了,存在一个转发的开销,混杂模式呢,网卡上收到的负载都会完全交给所有的虚拟网卡上,于是就算一个网卡上没有数据,但也会被其它网卡上的数据所影响。
这两种方式都不够完美,我们知道,真正解决这种网络问题需要使用VLAN技术,于是Google的同学们为Linux内核实现了一个IPVLAN的驱动,这基本上就是为Docker量身定制的。
Namespace文件
上面就是目前Linux Namespace的玩法。 现在,我来看一下其它的相关东西。
让我们运行一下上篇中的那个pid.mnt的程序(也就是PID Namespace中那个mount proc的程序),然后不要退出。
$ sudo ./pid.mnt
[sudo] password for hchen:
Parent [ 4599] - start a container!
Container [    1] - inside the container!
我们到另一个shell中查看一下父子进程的PID:
hchen@ubuntu:~$ pstree -p 4599
pid.mnt(4599)───bash(4600)
我们可以到proc下(/proc//ns)查看进程的各个namespace的id(内核版本需要3.8以上)。
下面是父进程的:
hchen@ubuntu:~$ sudo ls -l /proc/4599/ns
total 0
lrwxrwxrwx 1 root root 0  4月  7 22:01 ipc -> ipc:[4026531839]
lrwxrwxrwx 1 root root 0  4月  7 22:01 mnt -> mnt:[4026531840]
lrwxrwxrwx 1 root root 0  4月  7 22:01 net -> net:[4026531956]
lrwxrwxrwx 1 root root 0  4月  7 22:01 pid -> pid:[4026531836]
lrwxrwxrwx 1 root root 0  4月  7 22:01 user -> user:[4026531837]
lrwxrwxrwx 1 root root 0  4月  7 22:01 uts -> uts:[4026531838]
下面是子进程的:
hchen@ubuntu:~$ sudo ls -l /proc/4600/ns
total 0
lrwxrwxrwx 1 root root 0  4月  7 22:01 ipc -> ipc:[4026531839]
lrwxrwxrwx 1 root root 0  4月  7 22:01 mnt -> mnt:[4026532520]
lrwxrwxrwx 1 root root 0  4月  7 22:01 net -> net:[4026531956]
lrwxrwxrwx 1 root root 0  4月  7 22:01 pid -> pid:[4026532522]
lrwxrwxrwx 1 root root 0  4月  7 22:01 user -> user:[4026531837]
lrwxrwxrwx 1 root root 0  4月  7 22:01 uts -> uts:[4026532521]
我们可以看到,其中的ipc,net,user是同一个ID,而mnt,pid,uts都是不一样的。如果两个进程指向的namespace编号相同,就说明他们在同一个namespace下,否则则在不同namespace里面。
这些文件还有另一个作用,那就是,一旦这些文件被打开,只要其fd被占用着,那么就算PID所属的所有进程都已经结束,创建的namespace也会一直存在。比如:我们可以通过:mount –bind /proc/4600/ns/uts ~/uts 来hold这个namespace。
另外,我们在上篇中讲过一个setns的系统调用,其函数声明如下:
int setns(int fd, int nstype);
其中第一个参数就是一个fd,也就是一个open()系统调用打开了上述文件后返回的fd,比如:
fd = open("/proc/4600/ns/nts", O_RDONLY);  // 获取namespace文件描述符
setns(fd, 0); // 加入新的namespace
参考文档
(应网友card323加入)
(全文完)
(转载本站文章请注明作者和出处 酷 壳 – CoolShell ,请勿用于任何商业用途)


 (43 人打了分,平均分: 4.37 )
《Docker基础技术:Linux Namespace(下)》的相关评论
耗子老师,你好。拜读您这个系列的文章,就我目前所知,Docker是基于了namespace和cgroup,能讲一下cgroup与namespace的关系么?
会有一系列的文章的。请期待。
172.40.1.0/24不是一个私有网段吧……B类私有段是172.16.0.0/12,到172.31.255.255就结束了……whois 172.40.1.0也显示这个网段属于T-Mobile。
http://en.wikipedia.org/wiki/Reserved_IP_addresses 这里有所有的保留ip段……
是我脑子秀逗了。Sorry
我们公司正在使用docker做开发环境,博主这篇文章帮助我了解了docker一些原理,了解了原理,使用起来更顺手。
有几个地方看着有点眼熟,参考文档里是不是漏了一个
https://blog.jtlebi.fr/2013/12/22/introduction-to-linux-namespaces-part-1-uts/
你给的这个文章不错啊,不过我还真没看过。没事我补充进去。
期待一系列的后续文章。
讲的非常清楚,但是网络部分还有一些扩展资料:
http://blog.oddbit.com/2014/08/11/four-ways-to-connect-a-docker/
我也总结过一次:
http://memoryboxes.github.io/blog/2014/12/08/dockerzhong-de-wang-luo/
原理相同,具体讲了一下docker中如何使用网络。
其实真实场景下,不考虑安全性的话,为容器添加一个虚拟网卡,配置一个静态IP的话,还是很方便的,这样就可以启动一个类似于”真正虚拟机”的container了。但是貌似这种用法一直被视作”邪道”,但我觉得用来搭建测试环境真的挺方便的。
“Docker的源码中,它没有用ip命令,而是自己实现了ip命令内的一些功能——是用了Raw Socket发些“奇怪”的数据,呵呵”
是指使用netlink socket向内核发送netlink消息么?
@card323
我还以为又多了一篇汉语翻译呢.
陈老师,我的centos7,内核版本3.10,貌似不支持CLONE_NEWUSER,
只要clone函数加了这个选项,就会返回-1,报Invalid argument
@paco
升级内核版本到4.0,解决了
我本地是CentOS 6.3, kernel是2.6.32-279,没有,无法创建uid_map, gid_map,报错fopen error for /proc/15061/uid_map: No such file or directory
fopen error for /proc/15061/gid_map: No such file or directory,如何解决?
@robolwq
https://blog.jtlebi.fr/2013/12/22/introduction-to-linux-namespaces-part-1-uts/
里面没讲这一块,估计陈老师得自己brainstorm啦
求教,clone创建的namespace应该是没有名字的,而且无法在ip netns list中显示。但是在network namespace中,用ip netns add创建的namespace是有名字的,如何给一个clone出来的namespace加上名字
老师您好,我在自己的机器上测试User Namespace,报“open file error”,发现即使是root用户也无法在/proc下创建文件,请问是怎么回事?
@vinllen
老师您好,关于net namespace,我照您的方法尝试了,但是在namespace里我只能ping通本机eth0的ip地址,而无法无外部的主机连接,用终端firefox也是拒绝连接。我已经将网卡设置成了混杂模式,ifconfig eth0 primisc ,但是我用ifconfig查看的时候,lxcbr0.1的inet地址没有识别。请问我应该在哪里作出修改才能使namespace与外部通信呢?
留下我的邮箱[email protected] ,如您看到,希望您能抽空给我解答。期待您的回复。
@vinllen
经clone出的namespace的名字即是其子进程的pid。
耗子叔,做这个User Namespace实验的时候,uid_map文件可以生效,但是gid_map文件无法生效,里面内容为空,您知道有哪些可能性出现这个问题吗?
请参考http://man7.org/linux/man-pages/man7/user_namespaces.7.html
Linux 3.19 made a change in the handling of setgroups(2) and the ‘gid_map’ file to address a security issue. The issue allowed unprivileged users to employ user namespaces in order to drop The upshot of the 3.19 changes is that in order to update the ‘gid_maps’ file, use of the setgroups() system call in this user namespace must first be disabled by writing “deny” to one of the /proc/PID/setgroups files for this namespace. That is the purpose of the following function.
hi,
内核版本:4.4.0-21-generic
运行你的代码,可以映射uid,无法映射gid,具体如下:
——————————————————————————–
$ id
uid=1000(thebeeman) gid=1000(thebeeman) groups=1000(thebeeman),4(adm),24(cdrom),27(sudo),30(dip),46(plugdev),113(lpadmin),128(sambashare)
Parent: eUID = 1000; eGID = 1000, UID=1000, GID=1000
Parent [ 8420] – start a container!
Parent [ 8420] – Container [ 8421]!
Parent [ 8420] – user/group mapping done!
Container [ 1] – inside the container!
Container: eUID = 0; eGID = 65534, UID=0, GID=65534
Container [ 1] – setup hostname!
root@container: # id
uid=0(root) gid=65534(nogroup) groups=65534(nogroup)
——————————————————————————
如何解决?
以root权限运行程序,为什么我现在也不知道~正在查
请参考http://man7.org/linux/man-pages/man7/user_namespaces.7.html
Linux 3.19 made a change in the handling of setgroups(2) and the ‘gid_map’ file to address a security issue. The issue allowed unprivileged users to employ user namespaces in order to drop The upshot of the 3.19 changes is that in order to update the ‘gid_maps’ file, use of the setgroups() system call in this user namespace must first be disabled by writing “deny” to one of the /proc/PID/setgroups files for this namespace. That is the purpose of the following function.
namesapce 的kind中主机名和域名的隔离策略是叫UTS不是UTD,作者可以改下。
感觉网卡的混杂模式有点像集线器一样,把收到的数据包给所有连在上面的设备都转交一份,由设备(这里是虚拟网卡)自己去选择接受与否。而ipvlan就有点像交换机了,定点转交。不同的是,ipvlan是根据ip定点转交,工作在第三层;交换机是根据mac来定点转交数据包,工作在第二层。
#define _GNU_SOURCE
#include <stdio.h>
#include <stdlib.h>
#include <sys/types.h>
#include <sys/wait.h>
#include <sys/mount.h>
//#include <sys/capability.h>
#include <stdio.h>
#include <sched.h>
#include <signal.h>
#include <unistd.h>
char* const container_args[] = {
“/bin/bash”,
NULL
};
char* const container_envp[] = {
“PATH=/bin”,
“TERM=console”,
“HOME=/root”,
NULL
};
void set_groups(char* file, char* value) {
FILE* groupfd = fopen(file, “w”);
if (NULL == groupfd) {
perror(“open file error”);
return;
}
fprintf(groupfd, “%s”, value);
fclose(groupfd);
}
void set_map(char* file, int inside_id, int outside_id, int len) {
FILE* mapfd = fopen(file, “w”);
if (NULL == mapfd) {
perror(“open file error”);
return;
}
fprintf(mapfd, “%d %d %d”, inside_id, outside_id, len);
fclose(mapfd);
}
int container_main(void* arg)
{
printf("Container [%5d] - inside the container!\n", getpid());printf("Container: eUID = %ld; eGID = %ld, UID=%ld, GID=%ld\n",
(long) geteuid(), (long) getegid(), (long) getuid(), (long) getgid());
printf("Container [%5d] - setup hostname!\n", getpid());
//set hostname
sethostname("container",10);
//set root directory
chroot("rootfs");
//change to `/`
chdir("/");
//remount "/proc" to make sure the "top" and "ps" show container's information
mount("proc", "/proc", "proc", 0, NULL);
execvpe(container_args[0], container_args, container_envp);
printf("Something's wrong!\n");
return 1;
}
int main()
{
const int gid=getegid(), uid=geteuid();
printf("Parent: eUID = %ld; eGID = %ld, UID=%ld, GID=%ld\n",(long) geteuid(), (long) getegid(), (long) getuid(), (long) getgid());
printf("Parent [%5d] - start a container!\n", getpid());
unshare(CLONE_NEWUTS | CLONE_NEWPID | CLONE_NEWNS | CLONE_NEWUSER);
pid_t container_pid = fork();
if (!container_pid) {
/* since Linux 3.19 unprivileged writing of /proc/self/gid_map
* has s been disabled unless /proc/self/setgroups is written
* first to permanently disable the ability to call setgroups
* in that user namespace. */
set_groups("/proc/self/setgroups", "deny");
//To map the uid/gid,
// we need edit the /proc/PID/uid_map (or /proc/PID/gid_map) in parent
//The file format is
// ID-inside-ns ID-outside-ns length
//if no mapping,
// the uid will be taken from /proc/sys/kernel/overflowuid
// the gid will be taken from /proc/sys/kernel/overflowgid
set_map("/proc/self/uid_map", 0, uid, 1);
set_map("/proc/self/gid_map", 0, gid, 1);
return container_main(NULL);
}
printf("Parent [%5d] - Container [%5d]!\n", getpid(), container_pid);
waitpid(container_pid, NULL, 0);
printf("Parent [%5d] - container stopped!\n", getpid());
return 0;
}
优化了2处:
1,去掉了进程间同步处理
2,解决无法改写gid_map映射